Clipboard Surgeon—Operate on Your Clipboard
In this exciting installment of Adventures in X11, we'll perform precise operations on our clipboard to generate desired output. So, pick up your instrument, and let's get to work!
In this case, of course, the instrument will be your keyboard. Strike the keys swiftly as you follow this worked example. You'll need a terminal emulator, TTY, or otherwise a virtual console in order to complete this mission.
First, install xsel.
Arch Linux:
sudo pacman -S xsel
The package will likely share the same name on Debian-based or RPM-based distributions.
Next, you'll need to exercise your bash scripting skills. Open a terminal, navigate to a directory, and create a file named clipboard-adventures.sh. I've created this file at ~/scripts.
The two options we'll be focusing on are -b and -o. -b tells xsel that we'll be operating on the clipboard, while -o outputs your current clipboard content to standard output. Standard output simply refers to the default location, usually the terminal, where output will be written. We can change this location in bash using various utilities to redirect the output somewhere else. Here is one way that we can use these options:
echo "copy this to the clipboard" | xsel -b
This command will copy the argument used for echo, which writes the subsequent content to standard output, to the clipboard. | (pipe), if you are not aware, is a pipe which directs echo's output into xsel. Chaining together commands like this in bash is incredibly common and very useful. Instead of echo writing to the terminal, which is the standard output in this instance, we redirect the output to the xsel command's standard input. Standard input is simply where a program receives input from. Think of it like connecting two pipes together; the standard output of echo connects to xsel's standard input. This is an important and useful concept to remember when working with bash.
Let's see a worked example of how what we've learned might be useful:
#! /bin/bash

echo "<details><summary>意味</summary>`xsel -bo`</details>" | xsel -b
There's a considerable amount going on here, so let's break it down.
We direct echo's output to xsel, which then directs it to our clipboard. echo first evaluates the string, and it then evaluates what is enclosed in the backticks (``) as an actual command as opposed to a string. xsel -bo outputs what is in the clipboard. Remember that -b tells xsel to operate on the clipboard, while -o writes to standard output.
After evaluating the enclosed command (which produces a string), we then pipe the output of echo to xsel -b, which then writes the resulting string to the clipboard.
My clipboard's content is now:
<details><summary>意味</summary>A word in Japanese that is used to reference the "meaning" of something.</details>
The reason is that my clipboard's content, before running this command, was "A word in Japanese that is used to reference the "meaning" of something." So, just like that, we can format the content of the clipboard by operating on it with xsel!
To use this script, we need to make it executable. Go to your terminal and execute chmod +x clipboard-adventures.sh. Every file has read/write/execute permissions for user/group/other. Explaining permission bits is beyond the scope of this article, but just know that by using chmod +x, we're allowing everyone to execute the script, which is what we want.
You could, alternatively, do this inside of your file manager if you can figure it out.
Now, whatever desktop environment you're using (I'm using GNOME), go to the keyboard shortcuts section and add a custom shortcut. You will be prompted to write a command in bash. Instead, fill in the absolute path of your script. Mine is /home/james/scripts/clipboard-adventures.sh. Add a keyboard shortcut, and you're done!
If you're not using a desktop environment, you can try xbindkeys, which works independently as long as you're using X11.
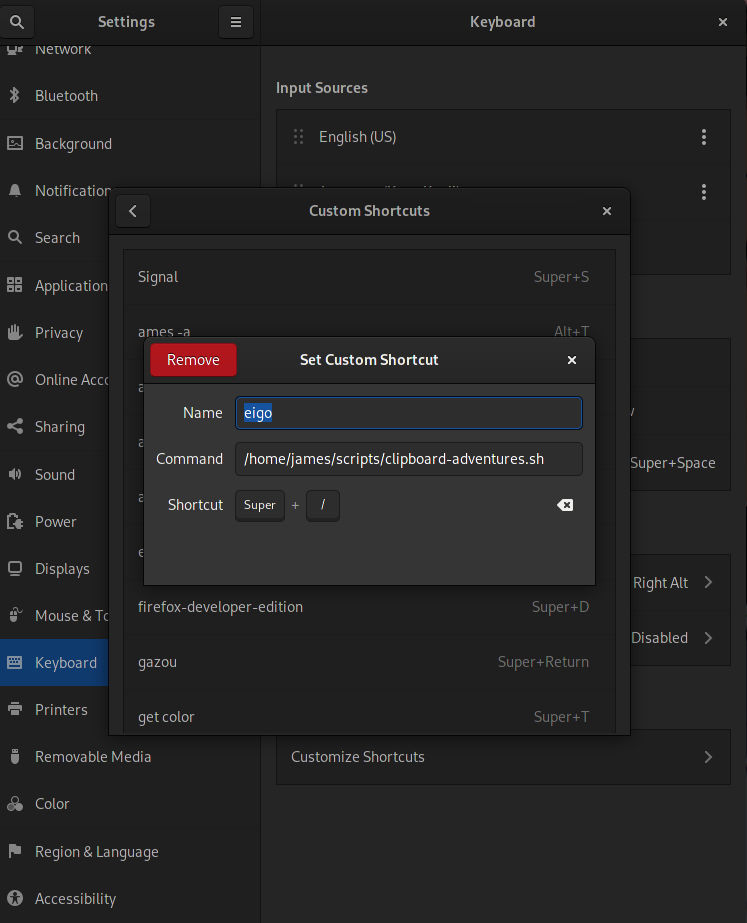
I have mapped this script to a keyboard shortcut so that I can quickly format clipboard content for use in Anki, but there are many other situations where formatting your clipboard content in a predetermined way is helpful.
Here's something else that I find regularly helpful—counting the words in your clipboard. While you could just use echo, paste the content of your clipboard, and pipe it to wc, that requires more user input and you also have to wait for the text to paste (which might take a long time, depending on how many words are in your clipboard).
There's a simpler way! Let's use xsel to accomplish this.
xsel -bo | wc -w
It's really that simple. If you just want to run this in a terminal now and then, you can alias this command to something easy to remember, like cbwc. But if it's something you use very regularly, why not map it to a keyboard shortcut and display the content in a notification on your desktop?
Here's how you would do that on GNOME and KDE, using notify-send:
#! /bin/bash

wc_num=$(xsel -bo | wc -w)

if [ $wc_num == 0 ]
then
    notify-send "Word Count" "You don't have any words in your clipboard."
elif [ $wc_num == 1 ]
then
    notify-send "Word Count" "You have $wc_num word in your clipboard."
else
    notify-send "Word Count" "You have $wc_num words in your clipboard."
fi
Then, make it executable, and map it to a keyboard shortcut. I've chosen SUPER+SHIFT+W. And, just like that, you get a quick and easy way to get the word count of your clipboard:

Just for good measure, here's how you get the word count for your clipboard on macOS:
pbpaste | wc -w
macOS has pbcopy and pbpaste built-in, which are tools for operating on your clipboard. If you're running macOS, see what else you can do with them.
I advise reading the man page your distribution ships with this binary in order to get a better understanding of how to use xsel. There's not much more to it, but some options might be of interest to you.
If you're looking to do something more complex, xclip is more featureful.

Looking to dive into Desktop Linux?
A Guide to Desktop Linux in 2025, available for purchase as an eBook and in Print, is just the handbook you need to orient you on this journey.
Whether you're worried Windows no longer has your best interests at heart, or you're just plain curious, this guide will help you get up and running while avoiding all of the usual potholes and footguns along the way.
If you tried Linux a long time ago, you'll be glad to know all aspects of the desktop have only gotten better over time. You might not even recognise it!
It's not 1998 anymore. It's been over 30 years since Linux was first released, and the Linux Desktop has undergone seismic shifts in usability and capability over the years. This book is designed for the modern age and helps you take advantage of all the latest technology available for desktop Linux. Even if you've used Linux before, things have changed a lot in just the last few years.
That's not to say the Linux Desktop isn't as quirky as it has ever been, but the jankiness has been sanded off in many areas. There's plenty you can do on Linux, and yet it would be a lie to say there isn't a cost to that freedom most of your penguin friends aren't forthcoming about. This guide acknowledges the limitations of the Linux world and doesn't try to hide them from you.
In this book, you'll find chapters about:
- getting your new Linux distribution setup on your computer
- providing step-by-step guidance for installation, software compatibility,
- gaming, and productivity
- exploring the history of desktop Linux
- the bright yet uncertain future of Linux
Buy this book now and dip your toes into the weird and wonderful world of Desktop Linux. Just don’t blame me when your house starts filling up with penguin plushies and red hats.
Written by
James North
Project Manager and Company Director at Evolvepreneur.
Part-time system administrator for Evolve Systems Group.
Part-time writer and author of A Guide to Desktop Linux in 2025.
Symfony developer.
You Might Also Like
How to create professional audiobook .m4b files in under a minute using your WEB BROWSER!

James North
May 31, 2026




Comments (0)
No comments yet. Be the first to comment!